Forced Item Selection Setup
When a POS operator opens a table and enters the number of covers, forced item selection can be used to present a panel that requires the operator to add products matching the number of covers entered. If needed, the operator has the option to skip adding products. This page outlines the setup required to enable this functionality.
Forced Item Selection Topics
Enabling Forced Item Selection
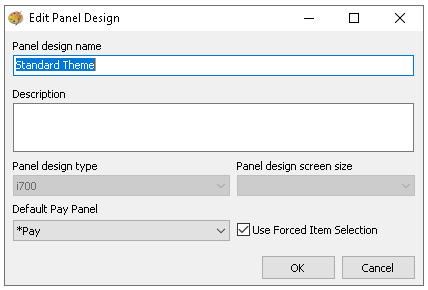
By default this option is not enabled and needs to be configured for use.
Follow these steps to enable the feature:
-
Select an existing Theme Panel Design
-
Click Edit
-
Select the check box to enable Use Forced Item Selection
-
Click OK
After selecting this setting it will automatically create a forced item selection panel in the selected design
Panel Configuration
Follow these steps to configure the panel:
-
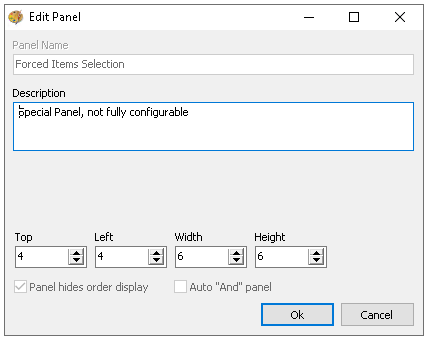
Select the Theme Panel Design where forced items selection was enabled
-
Click Design
-
From the Select Panel drop down choose Forced Items Selection
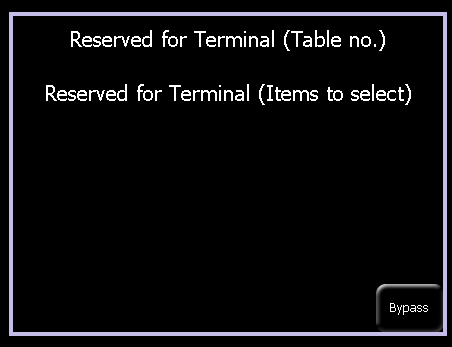
By default the panel is only 6 x 6 and has two rows of reserved lines for text that is displayed during POS operations, the panel can be made bigger by selecting the 'Speech Bubble / Question Mark' icon and adjusting the Top, Left, Width and Height values.
-
From the Button Picker select the required products and selected functions by dragging on to the panel
Forced item panels have a restricted selection of buttons that can be addedAdjust the properties of the buttons as required, Size | Colour | Position | Security
-
Click Save
In this example hot drinks have been added to the forced item selection panel and will be displayed if opening a standard or per seat table

